Create a ZIP file that Mobile Locker can open by placing index.html and presentation.png at the root level.
Mobile Locker will not detect your presentation correctly unless
index.htmlis at the root of the ZIP file. Your thumbnail also will not appear unlesspresentation.pngis at the root of the ZIP file and is exactly520×260pixels.
Quick Requirements Checklist
- ✅ Put
index.htmlat the root level of the ZIP file - ✅ Put
presentation.pngat the root level of the ZIP file - ✅ Make
presentation.pngexactly520×260pixels - ✅ Use relative paths for all resources (CSS, images, JavaScript)
- ✅ Keep all presentation resources inside the ZIP file
- ✅ Test your file structure before uploading
Correct Folder Structure
Mobile Locker does not require a specific internal folder structure beyond index.html and presentation.png at the root of the ZIP file.
For example, your ZIP file could look like this:
your-presentation.zip
├── index.html          ← Main HTML file at root level
├── presentation.png    ← Thumbnail image (520x260px)
├── css/
│   └── styles.css
├── js/
│   └── app.js
├── images/
│   └── photo.jpg
└── assets/
    └── other-files...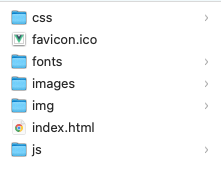
Correct: index.html should be at the top or root of the zip file.
Incorrect Folder Structure
Avoid nesting your main files in subdirectories:
your-presentation.zip
└── public/             ← ❌ Do not put files in subdirectories
    ├── index.html      ← ❌ This will not work automatically
    ├── presentation.png
    └── other-files...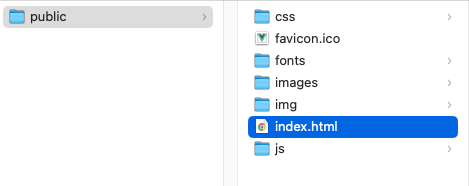
❌ Incorrect: index.html is nested in a "public" subdirectory.
Use Relative Paths for Resources
Always use relative paths when referencing resources in your HTML:
<!-- ✅ Correct relative paths -->
<link rel="stylesheet" href="css/styles.css">
<script src="js/app.js"></script>
<img src="images/photo.jpg" alt="Description">

<!-- ❌ Avoid absolute paths -->
<link rel="stylesheet" href="/css/styles.css">
<img src="http://example.com/images/photo.jpg" alt="Description">
Do not load external resources such as Google Fonts, external images, hosted JavaScript files, or third-party CSS files. Mobile Locker presentations are designed to work offline, so external HTTP requests will fail.
Bundle every font, image, stylesheet, script, and other asset inside your ZIP file, then reference those files with relative paths.
For more details, see our HTML Programming Guidelines.
You should always reference images, CSS, and other resources using relative paths to where the HTML file is. Read Use Relative Paths for resources.
Thumbnail Requirements
Include a thumbnail image for your presentation:
- Filename:
presentation.png - Dimensions:
520×260pixels - Location: Root level of the ZIP file (same folder as
index.html)
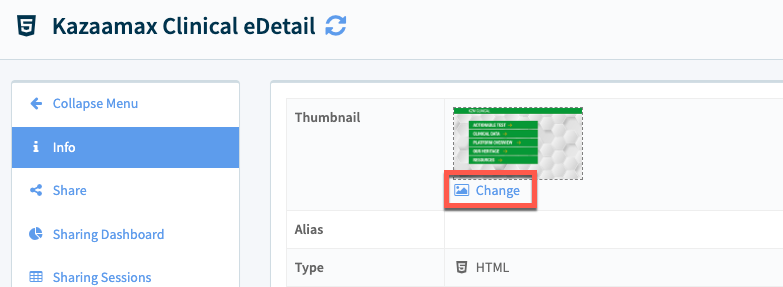
The thumbnail will be automatically detected and used in the presentation library. You can change it later through the presentation settings, but including presentation.png initially saves time.
Common Issues and Solutions
Issue: Presentation won't load
Solution:
Verify that index.html is at the root level of your ZIP file.
Issue: Resources (CSS/images) not loading
Solution
Check that all file paths are relative and match your actual file structure.
If you reference external URLs such as Google Fonts or third-party scripts, move those files into your ZIP file and load them locally instead.
No thumbnails appear
Solution
Ensure presentation.png is exactly 520×260 pixels and located at the root level.
Step-by-Step ZIP Creation
On Windows:
- Place all files in a folder with
index.htmlandpresentation.pngat the top level - Select all files and folders (not the parent folder)
- Right-click and choose "Send to" → "Compressed folder"
On Mac:
- Place all files in a folder with
index.htmlandpresentation.pngat the top level - Select all files and folders (not the parent folder)
- Right-click and choose "Compress items"
Using Command Line:
# Navigate to your project folder
cd /path/to/your/presentation

# Create ZIP file with index.html and presentation.png at the root level
zip -r presentation.zip . -x "*.DS_Store" "*.git*"
Need Help?
If you're still having issues with your ZIP file structure, contact support with a sample of your ZIP file structure or the presentation's ID from the URL
